Thursday, March 24, 2011

Springtime Hatch


This year we've got some lovely speckled and brown Australorpe eggs.  They arrived yesterday but the incubator wasn't holding at the steady 100 degrees we needed, so I spent considerable time last night fiddling with it, brought the eggs up to room temp overnight, and settled them into the automatic turner this morning.  It was hard to leave for work, but Conor is keeping a close watch on the temps. 


This is what our girls should look like full grown.  Based on pictures of the seller's flock (we bought on ebay) the hens are almost completely black with a purplish sheen.  The eggs seemed good and healthy when they arrived - and fast shipping!  Especially given that they traveled all the way from Oklahoma!  We paid for 12 eggs but she put in an extra, which was helpful since one cracked during shipment.  I have doubts about the handling of these priority mail shipping boxes and how that affects the eggs, but we'll see. Last year I picked them up and drove the Rhode Island Red eggs home on a couple of pillows - very tender care - and we had a 100% hatch rate. I don't expect nearly that good this year.


And here's a photo of our red beauties sampling the new spring grass (and everything else).  Unfortunately the greenest things out there are rhododendrons and strawberries, so I had to keep a close eye on them.

Saturday, March 19, 2011

Planting season

The season for sprouting has begun!  Admittedly we planted the onions, leeks and shallots back on February 1st but the major plantings occurred in the last week or so - tomatoes, peppers, eggplants, brassicas, crucifers, celeriac and lettuces.  In addition, we innoculated some oak logs with mushroom spores!


We always order almost exclusively from Fedco - a seed co-op located in Clinton, Maine.  They have amazing selections of the types of seeds we want, great prices, and a lovely hand-illustrated catalogue.  I usually read it cover to cover a few times before making any choices.

 
The mushroom plugs are oysters.  After drilling a small hole, the plugs are pounded into the log with a hammer, then covered with some wax to prevent drying.  I started the logs early, indoors, with the hope of a few good fruitings by autumn.  Since the weather is warmer now I'm planning to bring the logs outdoors and keep them under a tarp to keep them moist, but without rotting the bark.


We've also been doing some pretty amazing building projects... more on that to follow.  And tomorrow is the big day - turning the soil and planting some peas and fava beans over at the community garden!

Saturday, March 5, 2011

Winter Hibernations


Despite the long hiatus in our posting we have been busy this winter.  Most of our mini-farm-made produce involves fermenting and brewing - including lots of vinegars, beer for the summer, limoncello, kefir, yogurt, miso and bread baking.  We've been experimenting with jerkies too.  The photo above shows our experiment with making cider vinegar.  I used a champagne yeast with one gallon of cider - with an air lock - fermented for a month and then combined with 'mother'.  The other batch was just poured from the gallon into a jar and allowed to sit for 4 months.  Surprisingly, the 'natural yeast' batch is forming a better 'mother' - so we'll see about flavor down the road.  I started making vinegar last year with a 'raw culture' from Bragg's vinegar.  Combined with a cup of this raw vinegar, a bottle of wine will take 4-6 months, depending on temperature, to form the thick 'mere de vinaigre' on top.  The acidity of the finished product depends on how long the vinegar is allowed to feed.  We also have been experimenting with adding small amounts of new wine or beer every few weeks.  The only real requirements for the culture are relative darkness, warm (70 degree) temperatures, plenty of oxygen (so use a cloth top), and because the culture uses oxygen it rests on the top of the liquid.  Disturbing the jar can cause the mother to sink.  Although a new one will form, I think its best to refrain from agitating the jar too much.


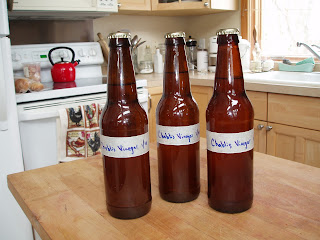
After 13 months this Chablis Vinegar tasted perfect.  I removed the mother and used it for another vinegar - then strained this one through coffee filters.  It wasn't necessary, but I did 'pasteurize' it by bringing just to a boil for a minute.  This kills the microorganisms and allows me to bottle and cap it without worrying about exploding bottles.  Another option which I did try last year was to cork the bottles and periodically open them to relieve any pressure. 


The vinegar tastes better after resting for 6 months or so.  These will be perfect by next fall and will only deepen in flavor over time.  Each beer bottle of vinegar uses more than a bottle of wine, after evaporation during fermenting.  I'm hoping these will make good gifts for the holidays next year!