Wednesday, March 14, 2012

Tales of Winter


Hey Everyone,

   It seems like Spring has almost arrived, so I thought it would be a good chance to post about all of the changes to our little farm here since our last post in the Fall. We're going to try to be better this season about keeping this updated for everyone. As you will see in the photos below, we've been hard at work over the winter transforming some big parts of the backyard. We think it has turned out for the better :)

   The pictures that follow take us through the winter starting from the harvesting and storage days of November / December up to the sunny days of last week. Enjoy!


 Harvesting the day before Halloween:


Plenty still left in the ground!

Then came the snow, but not for long:


The veggies inside were doing fine though:

 The chickens were a little confused, but found their favorite perch eventually:


Moving on now to some harvest items...

 We have a late winter harvest of Batavian endive, purple radish and some carrots:


A nice heap of collards for freezer storage:


 Laying in the carrots for winter storage in sawdust:


These cabbages lasted us all the way to February stored in the cool garage!


And of course, some potatoes and drying beans:


Next we did some landscaping, reshaping the back garden and building a proper staircase out of timbers:


Then we added some bricks to make a nice path:


And most recently have begun the task of building some low fencing out of reclaimed lath and old doors:


Correction!  Most recently we have started SEEDS!!!


More to come... Stay Tuned!

Wednesday, September 28, 2011

September tidbits


Yesterday we harvested the rest of the hops - so much more than last year!  We tried to restrict the Cascade to 3 vines each but it was just so vigorous and took over the arbor at the top of the deck, 2.5 stories up.  The Willamette was more sedate but we got two 1-gallon bags of that variety.  We'll have closer to a trash bag full of Cascade... now to think of a brew with our hops and honey.  


This photo shows Mole, one of the new Silver Laced Wyandottes, with Mongo in the background.  We had to move them outside early but they get along fairly well with the older Rhode Island Reds (Whitey Ford to the left).  The Sussex and Australorps are outside now too, but they are still getting used to the great wide world and are a bit flightier.  Also more aggressive.  We've had second thoughts about mixing breeds, but time will tell how they integrate.


This is a photo of our first egg from the young hens!  They are much smaller for the first month or so and we're still debating whether to use a light in the coop.  With daylight decreasing each day I'm worried they'll stop laying entirely for the fall and winter, just when they're at the perfect laying age.  On the other hand, I like the idea of the girls keeping to a natural seasonal rhythm, just as I do.  Something to think about.

That beautiful orange pot is our new dutch oven.  It has seen a lot of use in the 4 weeks we've had it:  pickle juice, LOTS of applesauce, two batch of mac 'n cheese, and of course, crusty no-knead bread.  I can't believe we lived without one for so long.  Definitely our favorite piece of cookware.  


And a preview of the fall crops.  Unfortunately the hoop house isn't quite so photogenic right now because the hens found their way inside - pretty tragic actually.  But we've got some fall greens and radishes, as well as carrots, beets, daikons, and quite a few peppers, tomatoes and eggplants still on the vine.  At home we've started the coldframes but might be a little late this year.  More to come in future posts!

Thursday, March 24, 2011

Springtime Hatch


This year we've got some lovely speckled and brown Australorpe eggs.  They arrived yesterday but the incubator wasn't holding at the steady 100 degrees we needed, so I spent considerable time last night fiddling with it, brought the eggs up to room temp overnight, and settled them into the automatic turner this morning.  It was hard to leave for work, but Conor is keeping a close watch on the temps. 


This is what our girls should look like full grown.  Based on pictures of the seller's flock (we bought on ebay) the hens are almost completely black with a purplish sheen.  The eggs seemed good and healthy when they arrived - and fast shipping!  Especially given that they traveled all the way from Oklahoma!  We paid for 12 eggs but she put in an extra, which was helpful since one cracked during shipment.  I have doubts about the handling of these priority mail shipping boxes and how that affects the eggs, but we'll see. Last year I picked them up and drove the Rhode Island Red eggs home on a couple of pillows - very tender care - and we had a 100% hatch rate. I don't expect nearly that good this year.


And here's a photo of our red beauties sampling the new spring grass (and everything else).  Unfortunately the greenest things out there are rhododendrons and strawberries, so I had to keep a close eye on them.

Saturday, March 19, 2011

Planting season

The season for sprouting has begun!  Admittedly we planted the onions, leeks and shallots back on February 1st but the major plantings occurred in the last week or so - tomatoes, peppers, eggplants, brassicas, crucifers, celeriac and lettuces.  In addition, we innoculated some oak logs with mushroom spores!


We always order almost exclusively from Fedco - a seed co-op located in Clinton, Maine.  They have amazing selections of the types of seeds we want, great prices, and a lovely hand-illustrated catalogue.  I usually read it cover to cover a few times before making any choices.

 
The mushroom plugs are oysters.  After drilling a small hole, the plugs are pounded into the log with a hammer, then covered with some wax to prevent drying.  I started the logs early, indoors, with the hope of a few good fruitings by autumn.  Since the weather is warmer now I'm planning to bring the logs outdoors and keep them under a tarp to keep them moist, but without rotting the bark.


We've also been doing some pretty amazing building projects... more on that to follow.  And tomorrow is the big day - turning the soil and planting some peas and fava beans over at the community garden!

Saturday, March 5, 2011

Winter Hibernations


Despite the long hiatus in our posting we have been busy this winter.  Most of our mini-farm-made produce involves fermenting and brewing - including lots of vinegars, beer for the summer, limoncello, kefir, yogurt, miso and bread baking.  We've been experimenting with jerkies too.  The photo above shows our experiment with making cider vinegar.  I used a champagne yeast with one gallon of cider - with an air lock - fermented for a month and then combined with 'mother'.  The other batch was just poured from the gallon into a jar and allowed to sit for 4 months.  Surprisingly, the 'natural yeast' batch is forming a better 'mother' - so we'll see about flavor down the road.  I started making vinegar last year with a 'raw culture' from Bragg's vinegar.  Combined with a cup of this raw vinegar, a bottle of wine will take 4-6 months, depending on temperature, to form the thick 'mere de vinaigre' on top.  The acidity of the finished product depends on how long the vinegar is allowed to feed.  We also have been experimenting with adding small amounts of new wine or beer every few weeks.  The only real requirements for the culture are relative darkness, warm (70 degree) temperatures, plenty of oxygen (so use a cloth top), and because the culture uses oxygen it rests on the top of the liquid.  Disturbing the jar can cause the mother to sink.  Although a new one will form, I think its best to refrain from agitating the jar too much.


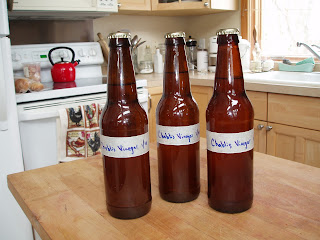
After 13 months this Chablis Vinegar tasted perfect.  I removed the mother and used it for another vinegar - then strained this one through coffee filters.  It wasn't necessary, but I did 'pasteurize' it by bringing just to a boil for a minute.  This kills the microorganisms and allows me to bottle and cap it without worrying about exploding bottles.  Another option which I did try last year was to cork the bottles and periodically open them to relieve any pressure. 


The vinegar tastes better after resting for 6 months or so.  These will be perfect by next fall and will only deepen in flavor over time.  Each beer bottle of vinegar uses more than a bottle of wine, after evaporation during fermenting.  I'm hoping these will make good gifts for the holidays next year!


Monday, January 10, 2011

Beet Risotto


I love and appreciate the freezer, but I don't think we'd make it without the 'fresh' root crops from cold storage.  This is the first year we're trying to grow all our own vegetables and this past week I had a few difficult nights trying to get excited about frozen kale or butternut squash, again!  Over the weekend we made a few exciting plans for the week's meals and splurged on lots of dairy products.  Our grocery bills these days tend to center around tofu and seitan products and of course, dairy.  We bought cheddar, monterey jack, sour cream, cottage cheese, ricotta and butter.  The plans include a nice veggie lasagna and some good old Boston baked beans in our crock.  If I have a minute I'll post the crock and recipe later this week.  But, as for Harvest Monday at Daphne's Dandelions, we did a nice broccoli raab risotto with a side of slow roasted beets.  We found that the best way to do beets is large julienne on the mandolin, a teaspoon of olive oil in a pan, cover and place on the woodstove while everything else cooks.  They seem to take only 20-25 minutes this way and cook in their own juices.  I find beets to be salty and sweet on their own, so I don't add anything else to them.  

This fall I packed the beets and carrots in wet sand but after a few weeks when the weather warmed considerably, I sorted them back out and removed the sprouts.  I wasn't sure if this was the best way to go, but I wanted to put the bigger ones on bottom and make pickled beets from the little ones.   Instead of sand I repacked with wet sawdust from our firewood pile.  I didn't have quite enough so used fresh pine shavings to finish.  After quite a bit of sharing and eating through mid-October we ended up with a tub each of beets and carrots, and only a crate of kohlrabi and cabbage.  The total canned amount of pickled beets was 25 pints. The fresh carrots are moving much more quickly than the fresh beets but we haven't yet touched our canned carrots!


The large golden beet was close to 2 pounds and I added a medium Detroit Red for a splash of color.  The risotto was delicious but took a LONG time since I had only brown rice.  Next time I'll check the cupboard first for short grain rice before prepping the other ingredients and getting my heart set on this meal.